Using PDQ Deploy and PDQ Inventory
in conjunction makes it easy to install and run a VNC session. Be sure to check out the accompanying video tutorials on installing and starting a VNC.
Installing VNC
To initiate a remote session, you’ll need to have a VNC server installed on the machine you want to control and the VNC viewer needs be installed on your own console. A VNC server provided in the Package Library is TightVNC. You can silently install this VNC server, but you will need to manually download and install a VNC viewer on your own console.
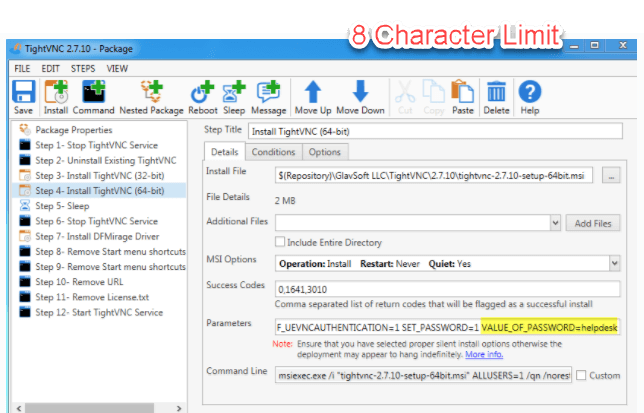
Before you rush off to deploy TightVNC, you’ll want to open up the package and look at steps three and four. These are two install steps for 32-bit and 64-bit. In each of these steps down at the parameters line a password is set for TightVNC. The parameter is: “VALUE_OF_PASSWORD= ”if you’re smart you’ll set that equal to something a little more creative than “helpdesk”. Make sure you make that change for BOTH the 32-bit and 64-bit install steps.
Note: VNC only allows an eight character password. The parameter will allow a longer password but will truncate the value to only eight characters.

Loading...
Initiating a VNC Session
You can quickly start a VNC session from PDQ Inventory. To set up a VNC protocol in PDQ Inventory go to Preference>VNC. Here is where you will navigate to the viewer exe. (For TightVNC it will be called tvncviewer.exe) For TightVNC use 0 as the display number, other VNCs might have a different display number though.
After that you’re ready to select any computer that has the TightVNC installed on it right click>Tools>VNC. (For you shortcut keystroke junkies: Ctrl+Alt+V) You’ll get a pop up requesting you to enter the password and you’re good to go.
Loading...


